This is part 3 of a series of posts I’m writing for Friendo, a web person who wants to get their hands a lot dirtier with Node and Postgres. You can read part 1 here, and part 2 here, where we say hello to Postgres and learn how to use it with Node.
In this post we’ll depart from the fun happy demo world where everything “just works super cool isn’t that awesome?” and into the weeds, trying to build an application foundation that won’t utterly suck in 6 months. If you want to look over/play with the code it’s right here although it’s still super preview.
The short summary here is that I wanted to build something reasonably real and sort of went off and built … something kinda real that I would use in production today. It was fun to put together and I thought I would share it with you.
Lots to get into, let’s go.
SQL… Leave It To The Pros
Poeple don’t like seeing SQL in their code for a variety of mostly silly reasons:
- “SQL doesn’t scale”
- “SQL === Injection Attacks”
- “Junior devs won’t understand it”
- “It’s ugly and hard to work with”
Injection attacks are definitely something you’ll want to worry about no matter what tool you use. Also: if you don’t know SQL then yes, it can appear verbose and daunting. To me, however, there’s a major reason you should use a simple abstraction: future you will be confused.
It can be really difficult to transition your brain from reading application code and tests to SQL, trying to reconcile what a query might do or return. Code is indeed a bit more expressive in this way, and it’s easier to refactor.
Let’s Use MassiveJS
My favorite DB tool is one that I created many years ago and has since been taken over by the ultra freaky amazing Dian Fay - MassiveJS. There’s a lot to explain about how it works, so I’ll just cut to the reasons I like it:
- It’s a dedicated Postgres tool that flexes the amazing features of Postgres and
- It has built-in support for JSONB. We like this.
The idea here is that we can start using JSONB, saving our models as documents and then, if we want, we can move to using a relational structure with very few code changes. Best of both worlds!
Booting MassiveJS In An Express App
Finally, some code! When MassiveJS boots up it scans your database and reads in your table information - column names, keys, etc. This is an asynchronous process which means we need to do change the way our app is booting.
I like to have everything in an `app.js file so it’s right in front of me, and I set everything inside of an async start function:
var createError = require('http-errors');
var express = require('express');
var path = require('path');
var cookieParser = require('cookie-parser');
var logger = require('morgan');
var session = require("express-session");
var http = require('http');
const bodyParser = require("body-parser");
const Massive = require("massive");

const start = async function(){

  var app = express();

  const db = await Massive(process.env.DATABASE_URL);
  app.set("db", db);
  //...

}

start.then(app => {
  const port = app.get("port");
  console.log(`App is running on port ${port}`);
});
This allows us to await any boot up stuff that is asynchronous - like Massive.
By default, the server boot stuff in Express is in bin/www but I like the app bits right in front of me so I know what’s happening.
The App Stuff, however, goes in it’s own boot file.
The Boot File
A practice in Sinatra land (Ruby) is to have a config/boot file where everything is loaded up. This can be a single file or, if you’re kicking up a lot of stuff, multiple files.
I decided to do a single boot file config/boot.js and in there I do app specific initialization. Not the plumbing of Express or Express middleware - the things I care about with the app itself:
const Auth = require("../lib/auth");
const Mail = require("../mail");
const Passport = require("./passport");
const Massive = require("massive");
const consola = require("consola");
const settings = require("../package.json");
require("dotenv").config();

exports.theApp = async function(app){

  let rootUrl = `http://localhost:${app.get("port")}`;
  if(process.env.NODE_ENV === "production" && settings.azure){
    rootUrl = settings.azure.siteUrl;
  }

  //set the root URL for use throughout the app
  app.set("rootUrl", rootUrl);

  consola.info(`Connecting to ${process.env.DATABASE_URL}`)

  //spin up massive... yay!
  const db = await Massive(process.env.DATABASE_URL);
  app.set("db", db);

  consola.info("Initializing Auth service...");
  Auth.init({db:db});

  consola.info("Initializing Passport service...");
  let passport = Passport.init({
    Auth: Auth,
    GoogleSettings: {
      clientID: process.env.GOOGLE_ID,
      clientSecret: process.env.GOOGLE_SECRET,
      callbackUrl: `${rootUrl}/auth/google/callback`
    },
    GithubSettings: {
      clientID: process.env.GITHUB_ID,
      clientSecret: process.env.GITHUB_SECRET,
      callbakUrl: `${rootUrl}/auth/github/callback`,
      scope: ["user:email"]
    }
  });

  consola.info("Initializing email...")
  Mail.init({
    host: process.env.SMTP_HOST,
    user: process.env.SMTP_USER,
    password: process.env.SMTP_PASSWORD
  })

  app.use(passport.initialize());
  app.use(passport.session());

}
There are a number of things going on here - enough so that I will definitely need a Part 4 (so I can explain what settings.azure is). Hopefully this looks like what it is: where everything is configured. Some people put configuration stuff inside of a module… that’s OK but I think it’s much easier to put it one place where you have access to your app, your db and other services.
If you squint your eyes it’s almost like poor-person’s IoC, where you initialize your stuff in a central spot using environment variables instead of some wonky XML configuration or other nonsense.
So there’s a lot going on here, for now let’s focus on Auth. Once Massive is instantiated, you’ll notice that I’m passing that instance to an Auth module. This is because Node’s modules are singletons by default, and that’s exactly what we want because Massive creates a connection pool to Postgres. If we accidentally create multiple instances of Massive, we’ll have multiple pools which can cause our app to crash as well as make Massive complain constantly.
I know there will always be only one instance because I can see it right here in my config. If other classes or services need it, I’ll pass it on on boot. I’ll get more into this below.
Authentication, Built In

The Tailwind Starter CSS Kit from Creative Tim
I wanted a specific use case for working with PostgreSQL on Azure and that grew into something I’ve wanted for a really long time: a super simple starter site without all the cruft and noise. I’m a little bit opinionated on things and I like it when an application design is as simple and straightforward as possible with room to grow.
As you can see above, I’m using PassportJS to handle OAuth. There’s enough going on with Passport that I decided to give it its own boot file, which you can see in the repo.
Here’s where we get to the meat of the matter, however: where does the auth logic live? The simplest approach is to just drop it on a User model:
class User{
  constructor(args){
    //init stuff
  }
  register({name, email, password}){
   //...
  }
  login({email, password}){
   //...
  }
}
This seems like a straightforward thing but it’s not because I need to work with the database at some point, which means I either need to require a database instance somewhere or pass it in through the constructor.
That’s becomes a mess, fast. I could try and to an ActiveRecord type of base class, which is where I was headed before because it’s simple - but (in my experience) this is the EXACT kind of emerging technical debt that I don’t want to deal with. This is my opinion based on my experience, but orchestrating logic with data-aware models leads to a giant mess.
Probably because I’m not disciplined enough to find rugs to shove my code mess under - but I’d rather do something a bit cleaner.
The Auth Service
The next logical step is to have a “service” class that deals solely with “Auth stuff”, like registering, logging in, changing passwords, etc. You could spread this around multiple files or, to start, just a single file as I have.
This is where I constantly find myself when working with Node: do I keep this module a singleton or export a class? I almost always go with the class option so I can pass in whatever config stuff I need to:
class Auth{
  constructor(args){
    //set things
  }
}

exports.init = function({db}){
  assert(db, "Need a db instance here");
  return new Auth({db:db});
}
This is a typical factory pattern where you don’t allow direct access to a class’s constructor and, instead, use a method that describes what you’re trying to do.
This works, but it has a drawback: you can’t get to the Auth instance unless you call init(). That’s a pain! I need this service in at least three spots:
- The boot file
- The auth route file
- The passport config file
Ideally, I could just require the Auth service and it shows up and works! This is where Node’s singleton thing comes in ultra handy. Instead of exporting a class instance, I’ll just set some variables on the singleton:
let db = null

exports.authenticate = function({email, password}){
  //... use the db in here
}

exports.register = function({name, email, password}){
  //... use the db in here
}

exports.init = function(args){
  assert(args.db, "Need a db instance here");
  db = args.db
}
This works great but only if you’re making sure the boot file is called before any app code. But you would do that anyway, wouldn’t you?
Here’s what it looks like in my editor:

Notice that last line there circled in red? That’s Massive doing it’s thing with a document: db.users.saveDoc(user)`. That’s one of the main reasons I love working with Massive - you can start out saving your models as documents and, later on, if you want to get relational about it go ahead! I really dislike migrations, but I LOVE Postgres for it’s data rules and speed. The best of both worlds.
Next Time: Deployment
One of the things I also added to this starter site is an “in-house” deployment setup using Azure. I love the way Heroku works - cuddling up to your app and helping you seamlessly deploy it - so I added a version of that experience to this starter app.
I added Commander from TJ because I think every app - even a web app - should have a CLI. I added a bunch of commands and a few other things to streamline the deployment experience and it all worked pretty well!

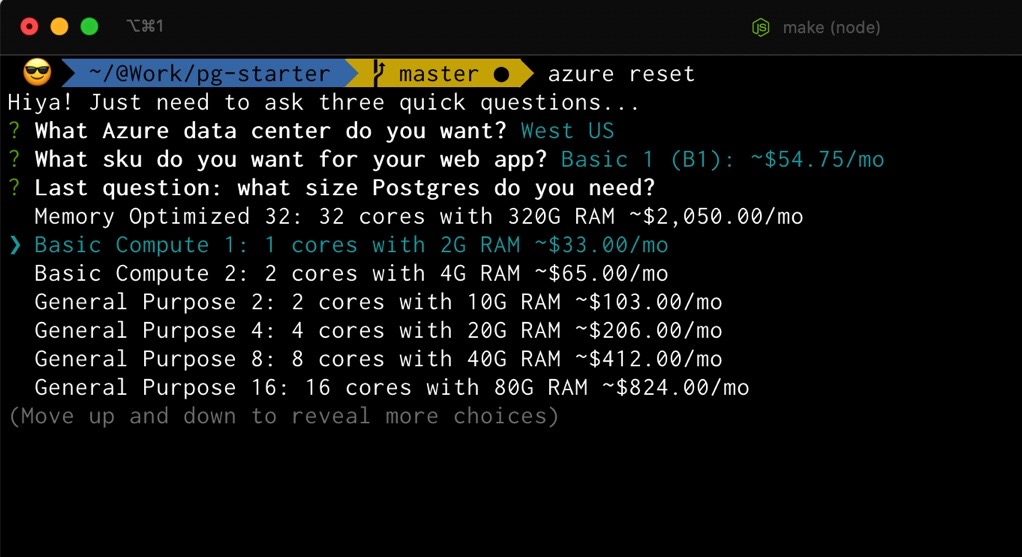
You start with some Q&A, asking about where, what size web and DB servers, and your configuration is set for you in your package.json:

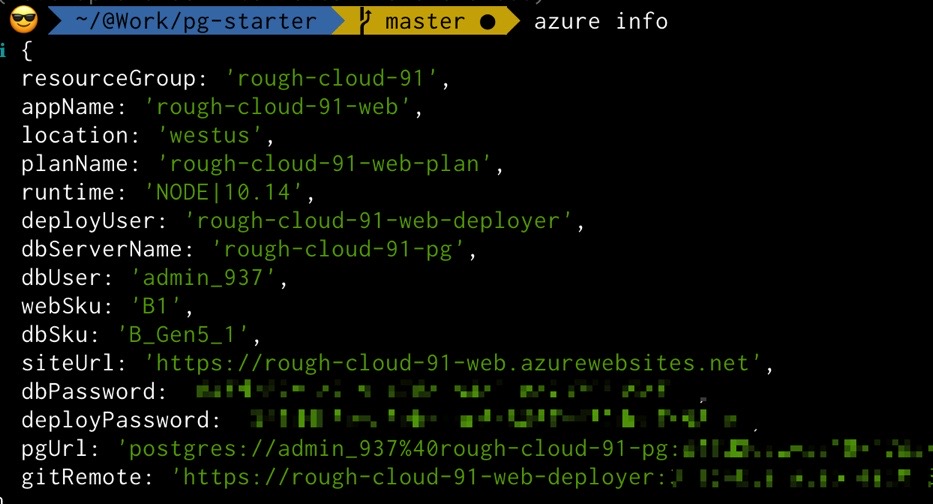
There are no passwords in here - they’re stored (for now) in a local DB in the root of the CLI which DOES NOT get committed. You can view everything, if you want, using a simple CLI command:

All of your deployment users and passwords are generated for you, as well as you app’s name, app servic plan name and so on. Again - I’ll blog more about this in the next post but the idea here is to make this as seamless and simple as possible.
And guess what! It works pretty well…

As you can see in the output, a remote git repo is setup for you locally so you can push/deploy using Git. A resource group, service plan, app settings, database along with database settings and even initialization with a users table - it’s all done and ready.
Within 8 minutes you can browse your site or, if you want, explore your production database using psql locally.
I threw in a bunch more stuff too - things that I’ve always wanted at the ready when working with a cloud provider (like logging, open my site for me please, back up my db here please, etc). I’ll share more in the next post.
Summary
This post had less to do with Postgres I suppose - more with how you work with it.